Thursday, August 23, 2012

Tips for Woodworking with Maple

Woodworking with MapleAlong with cherry, walnut and oak, maple is considered to be among the favorite hardwood choices for furniture building. Maple is generally considered to be strong, durable and very pretty when properly finished.

Maple does have it's drawbacks. It can be temperamental, particularly when finishing, and is susceptible to shrinkage. Making sure that your maple is well-seasoned and properly acclimatized to your environment will make a big difference in how your maple 
woodworking projects turn out, and how they hold up over time.

Varieties of Maple:

When buying maple from your lumber supplier, you may hear plenty of names for the wood: tiger maple, curly maple, birds-eye maple, fiddleback maple, red maple, soft maple, hard maple - the list goes on.

First of all, soft maple and red maple are typically the same thing. And the term soft maple is a bit of a comparative misnomer, as soft maple is harder than many other hardwoods (such as cherry). Soft maple is also often referred to as "tiger maple" for the tiger-like stripes in the wood, or curly maple, if the stripes are a bit more of the curly nature.
Hard maple varieties often will have more small knots that appear along the grain. This is often referred to as "birds-eye maple."

For years, maple was the wood of choice for building musical instruments. The term "fiddleback maple" came from this industry, as properly matched boards would be used to make the large back panels of guitars and fiddles.

Woodworking with Maple:

Part of the beauty of a properly built piece of maple furniture comes from proper matching of corresponding boards. Care should be taken to ensure that grain colors and patterns between neighboring boards should match as closely as possible. Many woodworkers will go as far as to buy thick maple stock and resaw it on a band saw, aligning the cut sides together for a perfectly matched pair of panels. This is particularly effective with tiger-striped maple used on drawer fronts and cabinet doors.
Because maple is such a hard wood, be certain that your tools, blades and bits are particularly clean and sharp. Working with sharp tools on hard woods is not only going to product better results, but it is actually safer than if they are a bit dull, simply because the tools will cut cleaner (and be less prone to tearing through the wood).

Finishing Maple:

As with other hard woods such as cherry, maple can be a bit temperamental to finish, particularly when staining. When applying a stain, be sure to use a pre-stain conditioner to try and even out the "blotchy" patches that tend to appear. This won't completely solve the problem though.

Stains tend to fill pores, cracks and crevices in wood. If the stain cannot find a pore to fill, it will be cleared away when the excess stain is wiped away.
The key to evening out the stain is to sand the project thoroughly, using progressively finer sandpaper grits. Start with 120 grit before moving up to 180, and finally 220. Try to evenly sand the entire project with this final sanding. Then, using some 320 grit paper, sand exposed end grain, which will tends to stain more heavily (sanding the end grain with finer grit will fill the pores of the end grain a bit more). Lightly wipe down the entire project before applying a pre-stain conditioner, followed shortly thereafter by the stain of your choice.
Another commonly used finishing technique on maple is to apply tung oil or linseed oil after the final sanding. These oils tend to bring out the curly or tiger looks of the maple. Follow the oil with a coat or two of shellac. For a more durable finish, top-coat over the shellac with a clear lacquer or polyurethane.

Tuesday, August 7, 2012

How to Build a Bookcase: Step-by-Step Woodworking Plans


On permanent display: mahogany, solid biscuit joints--and a whole lot of class.

I built my first bookcase in middle school. A multitiered assemblage of wooden planks laid across stacks of bricks, it was reminiscent of pieces from the early Flintstone Period--and I was proud to have made it myself. Since that masterpiece, I've built 50 or 60 more, most while working as a cabinetmaker for an interior design firm, where I learned the carpentry skills, design guidelines and construction techniques used in the bookcase shown here. Basically consisting of three plywood boxes fitted with a hardwood face frame, this piece looks built-in because it spans from wall to wall, and is trimmed with molding at the ceiling and floor. I used 3/4-in. birch plywood for the cases, 4/4 sustainably harvested African mahogany for the face frames and 3/4-in. mahogany plywood for the sides surrounding the doorway. With moderate skills and some patience, it wouldn't be hard to make this project fit any space.

Making Choices

Two pieces of plywood form each side of the cases. I separated them with 1/2-in.-thick plywood strips, so that when I attached the 2-in.-wide mahogany stiles, they'd align flush with the plywood sides. (In contrast, the horizontal mahogany apron attached to the front of each shelf overhangs the plywood.)

The shelves fit into dado joints routed into the case sides. Since the shelves were going to be glued and screwed into the dadoes, they couldn't be adjusted later. So I measured my books before I decided how tall the shelves should be. As a rule, a bookcase with shelves between 7 in. and 14 in. apart accommodates most everything. While books generally fit on 8- to 9-in.-deep shelves, I prefer deeper bookcases, so I ripped the plywood to a width of 11 7/8 in.

I chose to attach the wooden face frames--stiles, rails, valance and aprons--to the plywood cases with a biscuit joiner so that fasteners wouldn't mar the mahogany. But the quickest, easiest approach would be to use a pneumatic finishing nailer--then fill the nail holes with putty.

Bookcase
+ Click to enlarge


Getting Started

Bookcase Step 1
The Right Wood: Birch veneer plywood is ideal for building bookcases, and it was affordable at $45 per 4 x 8-ft. sheet. The mahogany was $7 per board foot--and certified by the Forest Stewardship Council.

Start by building a base out of 1x or 2x lumber. Make its depth 1 1/2 to 2 in. less than the depth of the bookcase itself. Its height must be 1/8 in. taller than the baseboard molding you plan to install to make sure the molding slips in easily. Set the base into position and check for level right to left and front to back. Fasten it to the wall studs using 3-in. drywall screws [ 1 ]. Also drive angled screws through the inside of the base and into the floor.

Rip the 3/4-in. plywood to width for the case sides and shelves using a table saw or circular saw and straightedge guide. Crosscut the case sides to length, making them 2 in. shorter than the distance from the top of the base to the ceiling. Then, cut all the shelves to length. The shelves should be no longer than 36 in. to keep them from sagging under heavy loads. Before proceeding, finish all the plywood pieces.

Routing the Dadoes

Bookcase Step 2

Clamp two opposing case sides edge-to-edge and mark each dado location with a pencil. Be sure and mark the location of the case tops far enough down on the case sides, so that the tops provide a joining surface for the valance. Next, clamp a straightedge guide across the two sides. Position the guide square with the plywood edge, install a 3/4-in. straight bit into the router and adjust it to cut 3/8 in. deep. Slowly push the router along the guide, crossing both plywood pieces. If you plan to use biscuits to attach the face pieces, cut the necessary slots with a biscuit joiner [ 2 ]. For the tall sides, space the slots about 12 to 14 in. apart. Cut three slots into shelves that are 18 in. long or less, and four into longer shelves. (I cut slots for No. 20-size biscuits.)

Assembling the Case

Bookcase Step 3

Apply carpenter's glue to the dadoes, set the plywood shelves in place and secure them with 1 5/8-in. drywall screws [ 3 ]. Since the bookcase has no back, you need to install a wood strip, or hanging rail, to screw each case to the wall. Cut the rail from a 1 x 3 or 1 x 4 to fit between the two case sides. Position it directly above the case top, and attach it to the case sides with glue and screws.

Bookcase Step 4

Set each assembled case on its base [ 4 ] and use a 4-ft. level to check for plumb. Next, secure the cases by driving 3-in. drywall screws through the hanging rails and into the wall studs.

Bookcase Step 5

Nail 1/2-in. plywood spacer strips to the case sides [ 5 ]. Use six strips total: two each at the bottom, center and top of the sides. Attach the neighboring case, if there is one. Otherwise, clamp a side panel to the plywood spacers, creating 2-in.-thick case sides.

Bookcase Step 6

Attach this panel by driving 1 5/8-in. trim-head screws from the inside [ 6 ].

With the plywood cases installed, cut the mahogany face-frame parts, which include: 2-in.-wide vertical stiles, 3-in.-wide horizontal base rails and valance and 1 1/2-in.-wide aprons that trim the shelves. Before installing each mahogany part, sand it smooth, then apply a finish.

Adding the Face Frame

Bookcase Step 7

Start with the horizontal base rail at the bottom of the bookcase. Hold the rail against the bottom shelf and mark onto the rail the center of each slot cut into the shelf. Then use the biscuit joiner to cut corresponding slots into the back of the base rail. Apply carpenter's glue to the front edge of the bottom shelf, and the rear of the base rail. Insert No. 20 biscuits into the shelf slots, then press the rail into place [ 7 ]. Use a rubber mallet to tap the rail tight. Wipe away any excess glue with a cloth. Attach the valance that runs across the top of the bookcase the same way. (Note: Its bottom edge aligns flush with the case top.)

Bookcase Step 8

Now install the vertical stiles. Hold each stile against the front edge of the bookcase sides, then transfer the biscuit­slot locations from the sides onto the stile. Cut slots using the biscuit joiner, apply glue to both surfaces, insert biscuits into the slots and press the stile home. Use a rubber mallet to tap it tight. Repeat the glue-and-­biscuit routine to attach the horizontal mahogany aprons to the shelves. Prior to installation, I routed a decorative profile along the bottom edge of each apron to create shadow lines that accentuate the shelves. The aprons are more than decorative, though. They stiffen the shelf to prevent sagging. Trim the top of the bookcase with crown molding [ 8 ] and the bottom with base molding [ 9 ]. Wait 8 to 10 hours for the glue to cure before filling the shelves.

Sunday, July 22, 2012

Beginning woodworking

A question I get asked from time to time is how to get into woodworking, what tools I would recommend, and where to start.

I can't really make good recommendations as to what specific brands of tools are better than others. Most of my tools were opportunistic purchases, with relatively little regard to specific brands. More often than not, it's price and a quick inspection to gauge the solidity of the tool that are the determining factors. My tools are usually not among the best that can be had, but good enough.

Where to start?

But where to start with woodworking? What machines do you need? My suggestion is that you should start by doing some woodworking, and only after that start buying big equipment.

I don't mean that entirely literally. But I think it's best if you buy just a few tools and start using those. As you get more comfortable with what you have, it becomes easier to understand what tools you should get next. It also reduces the risk of buying a workshop full of tools only to find out that you aren't really into woodworking.

Start by getting a few hand tools - a hammer, screwdrivers, nails, a few chisels, a hack saw, a try square, some sort of work table, and some clamps.

jigsaw, drill 
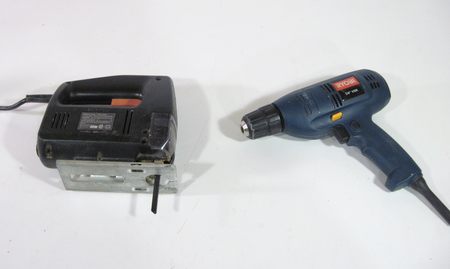
Your first power tools should probably be a drill and a jigsaw. Those are tools that come in handy here and there, even if you are not into woodworking. You won't be able to make any fine furniture with them, but it's enough to bang together a few projects for the basement or outside.
There are different grades of tools available at different prices. Salesmen will probably tell you to get good quality tools that last a lifetime. But the price difference between a cheap tool and a good quality tool can easily be a factor of four. My advice is to get cheap tools first and use them until they break. Once they break, it's time to consider getting something better. But unless you are a professional who uses the tools every day, even a cheap tool is likely to last a long time.

skillsaw A good tool to get next is some sort of circular saw. A circular saw cuts a lot faster than a jigsaw, and it's easier to make a straighter cleaner cut with it. It's also a very useful tool for cutting up big sheets of plywood, even 
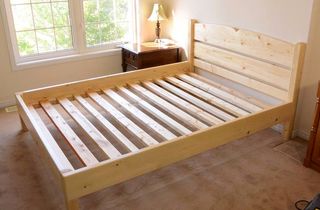
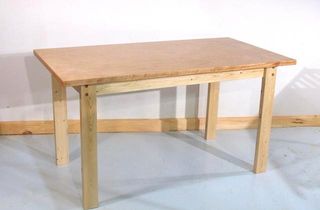
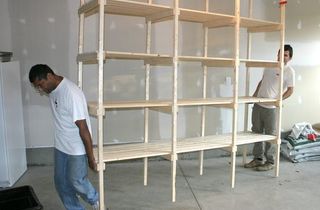
if you already have a table saw. At this point, you have enough tools for some simple projects such as this table or some storage shelving
You should consider getting a hand plane or two at this point, and maybe a workbench with a vise on it. It may be a good challenge to build a workbench while you are at it.


With just the tools mentioned above, you can already tackle some basic projects, such as these:


Bed from 2x4 lumber

Simple table

Storage shelves

Building sawhorses

Getting into stationary machines

You can get a lot of hand-held power tools, but after getting the assortment mentioned above, it's probably time to start looking at getting some stationary tools. 
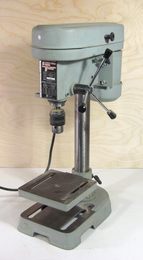
The most useful stationary tools are a drill press and a table saw. For the longest time, I only had a cheap old contractor saw, and only a very small drill press, but I made do with those. The difference between a good drill press and a cheap drill press is much smaller than the difference between a cheap drill press and no drill press, so don't wait until you can afford the perfect one.
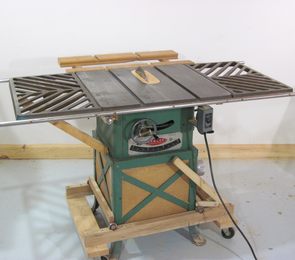
I can't say the same about a table saw. The cheapest benchtop table saws for under $200 tend to be awful, and will never produce a good clean cut. The better quality benchtop saws are much better, but cost as much as a contractor saw will. A contractor saw is the type of table saw with the motor at the back and open at the bottom. They tend to be made of cast iron, and good value for the money. Hybrid saws are also becoming popular. Hybrid saws are essentially built like contractor saws, but with the motor in the cabinet, just like a cabinetmaker saw. Those are also good value, but much cheaper than cabinetmakers saws. My present table saw is a hybrid table saw. The saw depicted at left is a 40-year old contractor saw, which I enclosed on the bottom to keep the sawdust inside.
To get a cleaner cut, it helps to buy a good quality saw blade for your table saw. With a decent table saw, and a good quality blade, it should be possible to get a cut that is clean enough that it should require only minimal work to prepare it for finishing.

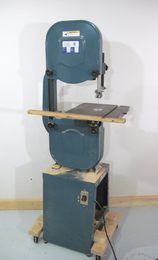
Those tools, plus a bandsaw were all I had when I built my marble machine one. So you can go quite a ways with just this much equipment.
A nice thing about a bandsaw is that it's not scary to use. Sure, a bandsaw can cut your fingers off too, but it will probably cut your finger slow enough that you can pull it back before it's a major injury. I cut into my thumb with a bandsaw once when I was a kid. I pulled back as soon as I felt it, and the cut on my thumb wasn't even deep enough to warrant a band-aid. So if table saws scare you, get a bandsaw first.
A bandsaw is also very handy. It cuts cleaner than a jigsaw, but perhaps one of the biggest advantages of a bandsaw is convenience. It's my tool of choice for making most quick rough cuts.I also use it for cutting up long scraps to short pieces to fit them in the scrap box. I really use the bandsaw a lot. I actually bought my bandsaw before I bought a table saw - I saw one marked down at a woodworking show, and I knew I'd get one eventually, so I jumped on it. That was before I built my own

belt sander and router 
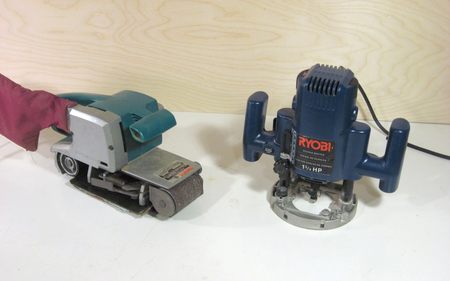
Next it's probably time for some more power tools. A belt sander often comes in handy. A router is also a really nice thing to have. Don't fret too much about which router to get - most woodworkers have more than one. So if you don't like some aspect of your router, it will still be handy as a second router later.
Most people would also recommend that you get some sort of miter saw for making crosscuts. Personally, I have always just used a crosscut sled. Miter saws just don't have the rigidity to produce a cut as clean as can be made with a table saw sled, so I have never been a fan of them.

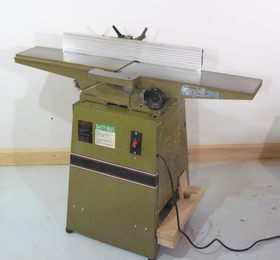
Moving up to the next level, the next machine to get would be a jointer planer. A jointer planer is very important if you want to glue up pieces of wood side-by-side to make panels. It's just plain all around handy for planing stock. I'd recommend you get a jointer planer before you get a thickness planer, because there is so much more that can be done with a jointer than a thickness planer. A thickness planer is really handy to get stock to the right thickness, although in a pinch, that can also be done on the table saw by putting the workpiece between the fence and the blade. If you cut from both sides, you can thikness stock up to twice the maximum depth of cut of your table saw.

Tools that I don't recommend buying

All the tools below have their uses, and you may eventually get to a point where they are needed. But if you are just starting out, I'd recommend waiting until later before buying any of the tools below:

Compound sliding miter saw

Hardware stores are full of big compound sliding miter saws. But before you buy one, ask yourself, how often do you need to cut miters on stock wider than a non sliding miter saw can handle? For the few times you have to do that, it's probably better to use a circular saw. The complicated mechanism of a compound sliding miter saw makes them less rigid. Which means an expensive compound miter saw may not make as clean a cut as a non-sliding miter saw for a third of the price.

Do everything combination machines

Avoid machines that can be converted from one machine to another. The ShopSmith is a prime example of such a machine. Multi purpose machines are usually good at one or two functions, but other aspects are compromised. But the real problem is that every time you need to switch functions, you need to convert the machine. And the cost of these machines is usually high enough that you could get several single function machines for the same price.

Workbench

If you want to get into woodworking, a good project to tackle is building your own workbench. It's really not that hard. So if building your own workbench is a bit too much work, or too intimidating, then take a step back and examine whether you really want to get into woodworking. This may be different if your goal is to cut silhouettes of kittens out of plywood with a scrollsaw, but I wouldn't call that sort of activity "woodworking".

Nail gun

Furniture shouldn't use a lot of nails. If you must use nails, you can always drive them in with a hammer. I am sure you have heard the saying "if all you have is a hammer, every problem looks like a nail". Now, if you have a nail gun then... Well, go figure.

Fancy table saw miter gauge and fence

Fancy miter gauges sure look nice, with all the coloured bits of anodized aluminium and brass knobs. But are those really something you need? Do you really think that an Incra brand miter gauge made out of bent sheet metal is more trustworthy than the more solid cast aluminium one that came with your saw? Sorry, but those are some of my pet peeves. Build yourself a good table saw sled instead, and you won't need to second guess it. If you cut a lot of 45-degree miters, make another sled with a 45 degree angle.

Scrollsaw

Scrollsaws are good for cutesey little projects like cutting puzzles or silhouettes of cutesey animals out of wood. But for making furniture, scrollsaws just aren't up to the task. Scrollsaws, along with Dremel tools, do have their uses in crafts, but for woodworking, they are just a little too small. That said, Dremel tools are very useful for sharpening brad point drill bits, forstner bits, and bandsaw blades, so they do have a use in woodworking.

Lathe

You can make nice candle sticks and blows with a lathe. And if your aspiration is wood turning, a lathe is definitely something you want to invest in. But few funtiture projects require the use of a lathe. I'm not saying you should never get a lathe, but a lathe is not one of those "must have" tools like a table saw or drill press.

Track saw

A track saw will allow you to make many cuts that would otherwise require a table saw, and is hard to beat if you need to cut up whole sheets of plywood. But for the price of a track saw, you can buy a table saw, and table saws are so much more convenient and versatile that a track saw is no substitute. So if you are just starting out, don't let anybody tell you that you don't need a table saw if you have a track saw.

Tuesday, June 26, 2012

How to Make a Woodworking Vise

Many woodworking benches utilize a vise with a heavy steel screw. The problem is that grease or oil from the screw can stain your woodworking project. A vise with more traditional wooden parts is a better choice and can be just as functional. With the proper parts and tools, you can make a shoulder vise, tail vise or just about any type of vise you need.

Instructions:

1. Drill a hole slightly larger than your wood screw in the center of each of the two hardwood jaw blocks.

2. Insert the wood screw into the front block, and attach the screw's garter--the metal ring just in front of the hole for the handle--using a wood screw in each of the screw holes in the garter. Pre-drill a pilot hole for each screw in the hardwood before inserting the screw.

3. Affix the rear hardwood jaw to the edge of your workbench. Using the hole in the rear jaw as a guide, continue the hole all the way through the bench's end support.

4. Align the hole in the knuckle with the hole on the back side of the bench's end support. Pre-drill pilot holes, and attach the knuckle to the support with 3-inch wood screws spaced about 4 inches apart.

5. Insert the wood screw through the hole in the rear jaw and into the knuckle. Turn the screw to engage the threads in the knuckle.

6. Attach the wooden handle through the hole in the front of the wood screw.

7. Test the operation of your vise by closing the jaws and reopening them.


Tips

  • Rub a bit of harden candle wax on the wood screws if lubrication is necessary.

    Warnings

  • When working with any types of power tools, always wear appropriate safety equipment, including safety glasses.


Tuesday, June 12, 2012

Finding just a bit more table space in a hallway or living room, only when you need it, isn't easy. A classic solution is the drop-leaf table, a 16th-century design still useful today because it's so efficient. Lift the leaf when you want more surface area. Drop it when you want a slimmer, neater look. There are several variations on these tables--and we chose the simplest one, with a single leaf and a fifth leg that swings out to support it. It's perfect for a foyer and can be built with basic tools and a small table saw in a home workshop.


Probably the trickiest step is cutting the leg tapers. We made it easier by designing a sled that carries the leg safely past a table saw blade at any angle. Additionally, the legs and aprons of the base go together with simple dowel joints and the top attaches easily, with screw-on fasteners. The result is a sophisticated design that you don't need sophisticated skills to carry out.


Download an animated walk through and full printable plans for this project (PDF, 2MB).

table plans

Download an animated walk through and full printable plans for this project (PDF, 2MB).


Make the Legs and Aprons

table

Rip and crosscut the leg blanks and the aprons. Then cut a groove for the tabletop fasteners in each of the four leg aprons. Make the sled base, stop block and positioning strip. Lightly clamp a leg blank to the sled base, and adjust the leg so it overhangs the sled edge by 14 in. Pivot the leg so the overhang intersects the edge at 6 to 7 in. from the leg's top. Firmly clamp the leg to the sled and attach the stop and positioning strip. Stick a strip of double-sided tape to the sled base. Set the saw fence for the width of the sled, place the leg on the sled and guide it past the blade [ 1 ]. Rotate the blank clockwise and rip the adjacent side. To rip the two remaining sides, place a 14-in.-thick spacer between the positioning strip and the blank [ 2 ]. Use a plane or sander to remove saw marks.

Join the Aprons and Legs

table

Use a dowel jig to bore holes in the aprons [ 3 ]. Wind a piece of masking tape around the bit to act as a depth stop. Spread some glue on the dowels and in the dowel holes, then clamp together two subassemblies--two legs and a short apron. After the glue has cured on those, join the subassemblies to the long aprons [ 4 ]. Shape the knuckle on the fixed gateleg apron, and use the dowel jig to bore the hole through the knuckle. Unless you have an unusually long bit, you'll need to use the dowel jig and bore the hole from both edges toward the center. Now cut the knuckle on the pivoting gateleg apron, test fit it to the fixed knuckle, then use the pivot hole in the fixed side to guide the drill bit through the pivoting side. Fasten the fixed apron to the table base; attach the pivoting apron with a dowel.

Make the Top

table

Rip and crosscut boards for the top and drop leaf. Plane the edge of each board smooth and straight; then glue and clamp two separate panels. Cut the top to finished size. Next, use a router and matched-pair router bits to cut the rule-joint edge on the top and the drop-leaf panel. Position each hinge on the top, and use a knife to mark its perimeter. Cut a shallow sloping notch around the perimeter, then finish the hinge mortise by paring as shown [ 5 ]. Screw the hinges to the top and position the drop leaf adjacent to it. Mark the corresponding hinge positions and cut the hinge mortises. Join the top and drop leaf; then use a large trammel to mark the curved edge. Separate the top and the leaf and cut the curve using a jigsaw [ 6 ]. Carefully plane and sand the leaf's circumference to shape.

Fasten the Top

table

Position the base on the inverted top and mark the location of the hinge knuckle on the gate leg and pivoting apron [ 7 ]. Cut a notch in these parts so they clear the hinge knuckle when they swing shut. After the notch is cut, position the top so it overhangs the base equally. Insert the tabletop fasteners in the apron grooves, and mark the hole locations in the top [ 8 ]. Remove the base, and bore pilot holes on each mark. Finish sand the top and apply finish to both sides of the top. Finishing both sides ensures equal moisture absorption and helps the top stay flat. Apply finish to the legs and the front and back surfaces of the aprons. Place the top on a padded surface, invert the base on it, and attach the base to the top by driving screws through each tabletop fastener and into the pilot hole.